How To Self Tape for an Audition by Puro Casting
It is increasingly common that Casting Agents ask actors to self-tape. Sometimes you are just not physically available to audition – you are on location or on tour, on holiday or the day job won’t release you. Other times we may do a virtual open call and ask anyone who is interested to submit themselves.
In much the same way that a good showreel can get you in the door, a self-taped audition will rarely land you the role but it could keep you in the mix for the next round of recalls and the opportunity to come in and meet the director.
And self-taping can also help you prepare for a face-to-face audition – there’s no better way for you to judge your own on-camera audition technique than to watch it back.
So it’s another tool the modern actor has to master. Here are some tips to get you started.
What kind of camera to use?
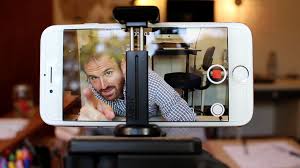
Technology is moving at such a pace that the quality of home shot footage is rarely an issue these days. Most smartphones have fantastic cameras that are more than capable, or you can use a camcorder, a stills camera with the ability to record moving images or even a built-in webcam on your computer. As long as you have the capability of transferring your images into some software that enables you to edit the footage and then export it to a more compressed and manageable format (more on that later) then you should be fine.
However, we would advise that whatever you use to film your audition please keep it held steady with a tripod or lay it on a secure surface. No handheld footage please.
Where to shoot, lighting and how to frame?
Ideally you would replicate a standard audition room with a plain background, preferably with pale coloured walls. No distracting patterns if possible, or clocks or posters or other items hung on the wall behind you – they can appear to grow out of your head.
The room should be quiet and have reasonable acoustics – try to avoid echoes. You don’t usually need to use a special microphone – the built-in ones should be up to the job. The camera will be quite close to you after all.
Lighting is something that people fret about and you should take some care, but remember you can do a quick test shoot to see what it looks like and make any adjustments necessary before taping your full audition. The optical sensors in most modern devices can be quite forgiving.
If using a smartphone please use it in landscape mode – everyone is used to watching footage on tv/monitors in this orientation.
 The bulk of your audition should be focused quite closely on your face, maybe with just the tops of your shoulders being visible. Sometimes all you need is the natural light coming from a window, but watch out for shadows.
For those of you who really want to go to town the classic configuration would be one reasonably strong light source off to one side, counteracted by another smaller diffuse light on the opposite side. Sometimes this second light is just the reflection from a pale coloured wall, but sometimes you have to place a lamp in a strategic position. The second light needs to be diffuse – i.e. not from a naked bulb, but one that is filtered through a light shade or fire-resistant material. But honestly – these days almost any lighting set up will work – except try to avoid any light source directly above (or below). Plus make sure you are not backlit otherwise you will appear in silhouette.
If your camera has a white balance make sure it is set correctly, otherwise check to see if there are presets for various locations, especially shooting indoors.
Experiment until you get lighting conditions and an image you are happy with – it shouldn’t take too long.
Use autofocus on your camera but again do a test shoot to make sure that the lighting is of a high enough level to enable it to function, and that the background is not confusing the sensors causing them to repeatedly focus on the wrong part of the frame.
There may be a temptation to ‘go on location’ and film your audition outside a castle or in a shopping center or somewhere that is relevant to the piece, but in much the same way that wearing a costume to an audition is frowned upon you should resist the temptation. If you don’t get distracted then we the viewer certainly will, and you will have less control over the sound and lighting.
Once you have your ideal set up you can use it again and again – like having your very own audition studio.
Preparing for the audition
Just because you are self-taping doesn’t mean you can skip the preparation required for any other kind of audition – learn your lines (no kidding – please don’t simply read them off screen and think we can’t notice – we can and it looks terrible!), make bold choices and create compelling characters, dress appropriately, avoid props. Of course, you have the benefit of being selective with which takes you end up submitting, but don’t let that make you become complacent. You really don’t want to be doing thirty or forty takes.
Filming the audition
It’s really helpful if you have an actor friend to read opposite you, preferably of the correct gender for the role. Have them sit/stand next to the camera so that your eyeline is in the right place close to the lens. If there is no-one at hand to read with you then just leave gaps where the other dialogue should be. We have received self-tapes where the actor themselves have recorded the other dialogue and then they play opposite themselves – this works pretty well, although there can be some issues with timing if a line is delivered too quickly and then there is an unnatural gap whilst waiting for the pre-recorded response.
Don’t look into the camera yourself – just like in a live audition – unless specifically asked to do so. And please try to have the camera at eye level – using a webcam on a laptop can create an especially unflattering angle so raise the laptop to eye level by placing it on a few books.
And then take a deep breath, relax, and work your magic.
If you have done your preparation then it should only take three or four takes, if that. Any more then you are either being too finickity, or you haven’t prepared enough. Remember that your self-tape is likely to lead to a live audition (or God forbid, the actual role) and if it takes you all day to warm up to do a usable take, you will soon be found out.
Ultimately, what you are after is one decent interpretation of the role from start to finish in one unbroken take. Just one – not lots of different versions, and not cut together from a variety of takes. In effect your self-tape takes the place of your first read when you enter an audition room – without any direction from the director or a casting director. If we like what we see we’ll call you in and give you a thorough workout.
One last thing – either before or after your main audition film a full length body shot of yourself – just a few seconds – so we can see your shape and size. If you like you can simply state your name, the name of your agent if you have one and the name of the role your are auditioning for, but this isn’t strictly necessary. And don’t make any jokes – stay professional.
Transferring to a computer or other editing device
If you are using a smartphone then it’s very likely that you’ll be able to edit the footage directly on the phone itself using an editing App.
Each other device is slightly different and will have it’s own way for you to transfer the footage onto your computer and into your editing software. Indeed sometimes you can bypass ‘taping’ your audition altogether by connecting your camera to your computer and recording directly to the hardrive (this is how we do it in our auditions)
The software you use doesn’t have to be terribly sophisticated and it is usually bundled free with your computer – on a Mac you can use iMovie or on a PC you can use Windows Movie Maker. If you don’t have either of those a quick Google of “freeware editing software” will give you a plethora of options.
Editing
Once your footage is imported into your software it’s time for the fun to begin. A title card is always useful – very simple, centered white letters on a black background, with your name, agent if you have one and name of the role and project you are auditioning for. The card should last about 4 or 5 seconds. Don’t use any gimmicky effects – whirling titles, zooming letters, Star Wars scrolling text. Keep it simple and classy.
Pick your best take of each scene – again, we normally only want to see one take of each scene unless we expressly ask otherwise. You may need to trim the beginning and end especially if you are self-operating the camera – dashing in and out of the frame to start and stop the camera recording.
Cross fade from the title card into the first scene, and then cross fade into any subsequent scenes. Again don’t use any snazzy transitions – no page curls or wipes or ripples. Your editing skills are not what we are looking for here.
And then end by cross fading into the full length shot of yourself. You’re done.
Exporting
If you are using a smartphone then it’s likely that you won’t need to ‘export’ your edited self-tape – you will be able to upload it directly from your phone to a website like Vimeo or Youtube, or email it straight to the casting director – but still read this section so that you can choose the right settings.
For everyone else using a computer – you should export your audition to either .mov format (Mac standard) or .wmv format (Windows standard). Almost all software will be able to hand this, and almost all software will have standard settings such as Low, Medium and High quality. If you really want to you can get all involved with frame rates and data rates and codecs and frames per second – but really the standard settings will be just fine.
When we digitise our own auditions we tend to use the Medium settings – it’s fast, doesn’t take an age to digitise and then upload to our website, and for the viewer the streaming starts immediately and is usually fast enough to give uninterrupted viewing. If you opt for the higher quality settings then the files are bigger – sometimes too big for the internet connection to keep up with – and you can end up with those frustrating stop/start videos. If our directors are on location in some remote part of the world we can’t assume that they have high speed internet access.
As a rule of thumb once our auditions are compressed and digitised each minute of footage is about 2.5mb of file size.
Labelling
This part is critical – all your hard work can be undone if you don’t get this bit right. Once you have a lovely edited self-tape file then please label it properly. When we ask for self-tapes we are very specific about how it should be labelled and we follow this convention:
CHARACTER NAME – Firstname Surname
Other casting directors may request a different label and please follow whatever instructions you are given, but if you are not given specific guidance then we would suggest using our system above. If not, your editing software will label your file in it’s own way and usually this is numerical, so your self-tape will be called something like:
IMG2032.mov
or
MOV_231.mov
or
My Great Movie 2
We sometimes receive between 200-300 self-tapes in a day (especially on ‘deadline day’) for many different roles in different projects. If your self-tape is not labelled correctly (and if you haven’t added a title card) then it is very difficult for us to find out who you are – and that means we can’t show your self-tape to the director. All that effort goes to waste!
And by labelling with the character name first (and in capitals) we immediately know which project the self-tape is for and we are able to move it quickly to the correct folder. Simple!
Sending it to us
By far our favourite method of receiving self-tapes is via Vimeo with the ability to download enabled in the Privacy Settings. We now download all self-tapes then upload them to our own website so that a director has everything in one place. Vimeo has brilliant settings that allow us to choose what quality we download your self-tape – so even if you’ve recorded in ultra-high definition and uploaded a massive sized file to Vimeo, we can download it very quickly in a far more convenient compressed format with Vimeo doing all the work.
There are other methods of sending a self-tape and again, you should follow whatever directions you are given. YouTube remains popular, or some people use a service like You Send It or Mail Big File to send exported files – but Vimeo works so perfectly, and is free to use, so this is always our preferred choice.
As an aside, please never ever send us the file as an email attachment! More often than not either your or our email programme won’t accept it anyway, but please don’t clog up our system with a massive file.
So that’s it – you should be ready to go!